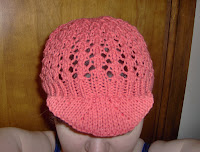
The Phoenix Hat Pattern (In the Round)
Finally it is here!!! A new hat for a new start in my life. No long explanations for this one.
Supplies:
Worsted Weight Yarn (I used Lion Brand Cotton Ease in Terracotta)
Size 8 Needles
2 stitch markers for brim
Plastic canvas to put into brim
Tapestry Needle
Worsted Weight Yarn (I used Lion Brand Cotton Ease in Terracotta)
Size 8 Needles
2 stitch markers for brim
Plastic canvas to put into brim
Tapestry Needle
Do 1-1.5" K1, P1 ribbing
Next Row: Increase 1 stitch for every 20 stitches while knitting.
The last Row counts as first row 1 of pattern rows. So begin with row two and repeat to desired length ending after a row 2.
Pattern Rows:
R1: Knit
R2: *K3, yo, sl1-K2tog-psso, yo* Repeat from * to *.
Begin Decrease Rows
D1: Knit entire row
D2: *K3, yo, sl1-K2tog-psso* repeat from * to *. (70 sts)
D3: Knit
D4: *K8, K2tog* repeat from * to * across row.
D5: *K7, K2tog* repeat from * to * across row.
D6: *K6, K2tog* repeat from * to * across row.
D7: *K5, K2tog* repeat from * to * across row.
D8: *K4, K2tog* repeat from * to * across row.
D9: *K3, K2tog* repeat from * to * across row.
D10: *K2, K2tog* repeat from * to * across row.
D11: *K1, K2tog* repeat from * to * across row.
D12: K2tog across row.
Cut yarn leaving long enough tail to thread tail through remaining stitches and pull up tight. Weave in ends.
Brim:Pick up 7 Sts
K1 row.
Next Row: P2, PM, M1, P3, M1, PM, P2, Pick up 2 more stitches
RS:K to end of row, Pick up 2 stitches.
WS: Purl to Marker, Slip Marker, Inc1, Purl to Marker, Inc1, Slip Marker, Purl to end, and Pick up 2 stitches.
Repeat last two rows until you have 10 stitches, Marker, 11 stitches, Marker, 10 stitches. You will be finishing after a knit row.
Turning row: Knit across.
RS: Bind off 2 sts slipping the first stitch instead of knitting it before binding off, Knit to end.
WS: Bind off 2 sts slipping the first stitch instead of knitting it before binding off, Knit to marker, Slip Marker, P2 tog, Purl to 2 stitches before marker, P2tog, Slip Marker, Purl to end.
Repeat last two rows until you get back to your original 7 stitches and cast off.
Cut a brim shape out of the plastic canvas slightly larger than the knitted brim so that it stays taught. Put inside the brim pocket you just knit and sew the pocket together so that the plastic canvas is concealed.
Happy Knitting. Please remember you can make one for yourself or a friend but please do not sell hats made from the pattern. If you would like to share the pattern please share the link and not the pattern itself. This pattern cannot be posted on any other site.
4 comments:
What a darling hat and quite a nice way to begin fresh and new again, the color is also very summery. Clever girl!
Wow that's a nice hat and your work is awesome as usual. Haven't visited here in awhile (Been sewing more), but must try this pattern soon, please stop by slipstitches.com anytime.
I just saw your new photo, I really like it - so glamorous!
I like your hats =)
I'm doing the basket wave one for my BF. I mentioned you patten in my http://www.ravelry.com listed projects =)
Post a Comment